This past week has been the most productive of the whole project to date. It feels like something just clicked, and the work is now progressing at an accelerated pace. Maybe it’s the four or five hours of work we’ve been able to put in every day (thanks to being on Christmas break), or maybe it’s the encouragement of seeing the light at the end of the tunnel. Maybe it’s just the daily double macchiato. Whatever, things are getting done and major progress is being made. We’re in the home stretch!
Here are many updates:
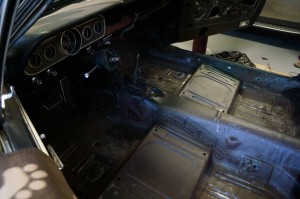
The carpet is in. There was some major rust in the floor pans, so many hours were spent with a rust grinder and shop-vac. Everything eventually came out pretty clean. All was sprayed with Rust-Oleum, as an extra line of defense, but there was still the damage in the right-rear pan to contend with. There was already a patch on the underside of the hole, installed by Ricardo, so my dad had the idea of putting a metal sheet above as well, so that not as much stress would be placed on it when somebody stepped into the rear.
Our first plan was to glue a sheet of steel down with liquid nails, but of course that didn’t work out. In hindsight, it wasn’t the smartest plan – gluing a steel plate to a not-very-flat surface – but it seemed a possibility in the moment. When that didn’t work, we replaced the steel with a sheet of aluminum, and the glue with screws (the way it should have been done in the first place). Unfortunately, and I’m still kicking myself for this, I didn’t get a photo of the final product… but try to imagine a shiny sheet of aluminum with 10-12 screws holding it down around the edges, and in any spot it was popping up. I guess I was too anxious to get on with putting the carpet down – I just forgot to photograph it.
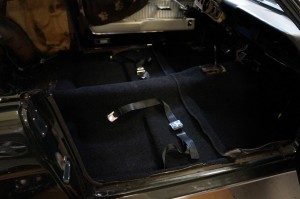
We cut the carpet – black instead of green, or rather yellow-green, as the original had become, and molded mass-back, meaning it has a nicely structured rubber backing – by laying it out across the template of the previous one to get a general fit. It still needs to be cut along the sides, in order to fit smoothly and not bulge out at some points, but it’s already a welcome change from what was there before.
Next to go in were the new, fancy seat belts – and the hardest part of that was figuring out in what order the washers and nuts go on the big screw to effectively secure the belts. They are really nice looking belts, and will make the interior that much more special – and safe.
The horn assembly has been taken off the old wheel and put on the new one. Everything cleaned up really well, and looks almost new. I still have to clean the inside of the assembly – the contacts, wires, etc. – and will install the new wheel as one of the last items, after the seats go in.
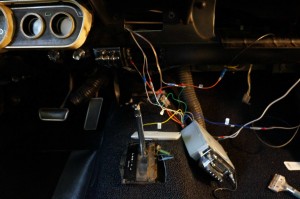
A major milestone was the completion of the radio wiring today. Before the carpet was in, I had laid down speaker wire from the new rear 6×9 speakers. I mounted the speakers in the new rear deck (this took a little longer than I had expected, as I ran into some difficulties with fitting the screws correctly), then ran wire to the left door speaker, and mounted both of those in place. Back in the summer, I thought we had found a constant source of power for the radio – but it turned out to be dome light wiring. As a result, it turned off whenever both doors were shut. The solution to this problem turned out to be running a wire directly off a lead from the positive terminal of the battery, through a small hole drilled in the fire wall, and into the radio. Everything turned out great, and now the radio is plugged in, mounted, and sounds amazing. We pretty much ran down the battery today listening to it while we worked.
Other things accomplished this week were the new glovebox liner and door and the trunk carpeting. These went relatively smoothly, though the glove box liner needs a few more screws to secure it in place.
The last major pieces to go in, apart from the center console and wheel, are the seats. I ran into some trouble with CJ Pony Parts, the retailer I’ve been ordering all my parts from, due to a delay in the new upholstery. I had ordered the upholstery, seat foam, and a new driver’s side frame in early December – but while the frame and foam arrived in a timely fashion, the upholstery did not. When I reached out to customer service this week, I learned that the product was on backorder with the manufacturer and would not arrive until sometime around January 13th. Senior projects are due to be completed by January 8th. That was a pretty stressful period… until today, when I got an email saying that it had in fact shipped, and was due to arrive Friday (tomorrow). Of course, we are in the middle of a blizzard here, so who knows if it will get here tomorrow or the next day, but it certainly is better than the 13th. Big relief.
I have posted a new photo album of the interior work Here and will be updating it until everything is done.


What amazing progress you’ve made, Sam! I loved reading the detailed, step by step tasks. And, sorry, laughed at the radio/dome light/door wiring snafu.
You almost have a cliff hanger here as we wait to see if you will meet the 18th deadline.
Wow Sam, You guys are really kickin’ some b___! Hope the upholstery came in today! The deadline looms but I know you can do it!